If you already have your own DNS server set up and running, and you consider yourself an expert in its configuration and operation, then consult the instructions "Manually Adding DNS-SD Service Discovery Records to an Existing Name Server" to see what DNS records you should add to your DNS server.
On the other hand, if you just want to try out Wide-Area DNS-SD, and you want to experiment with it first before you commit to making those changes on your main DNS server, this page tells you how to create a temporary setup for testing.
To set up your temporary test server is just four simple steps. These instructions are aimed at running the BIND 'named' server on a Unix system like Mac OS X, but the details are broadly similar on other systems.
First we create a private DNS domain called "home". This won't be visible to the rest of the world; only your own clients. Copy the text below, change X.X.X.X to the IP address of the machine you're using for this test, and then save it as a file called "/var/named/db.home". You can find the machine's IP address by typing "ifconfig" at a command prompt.
$TTL 10
@ SOA ns.home. hostmaster.home. (2006010101 10800 3600 604800 10)
                        NS  ns.home.
ns.home.                A   X.X.X.X
b._dns-sd._udp          PTR @
lb._dns-sd._udp         PTR @
_http._tcp              PTR Hello\ World._http._tcp
Hello\ World._http._tcp SRV 0 0 80 www.dns-sd.org.
                        TXT path=/Success.html
Now we tell named about our private DNS domain. Copy the text below, change Y.Y.Y.Y to the IP address the machine is currently set to use for its DNS service, and then save it as a file called "/etc/named.conf". On Mac OS X, you can find the machine's current DNS server address by typing "scutil --dns" at a command prompt, and using the first server address it displays. On other Unix systems you can look in the file /etc/resolv.conf.
options { directory "/var/named"; forwarders { Y.Y.Y.Y; }; };
zone "home" { type master; file "db.home"; };
On most Unix systems, you can start the named name server daemon by finding the init.d directory (usually it's something like /etc/rc.d/init.d) and typing:
./named start
To have the named server restart automatically after reboot, you'll have to add the appropriate links in the appropriate rcx.d directories.
On Mac OS X 10.4 you can start the named name server daemon by typing:
sudo /bin/launchctl load -w /System/Library/LaunchDaemons/org.isc.named.plist
The "-w" tells it to make the change persistent, so that after reboot the named server will be restarted automatically. To run the named server just once, and not have the change persistent, omit the "-w". You stop the server with the corresponding unload command:
sudo /bin/launchctl unload -w /System/Library/LaunchDaemons/org.isc.named.plist
Now you have a named server that thinks it's the authority for the "home" domain. However, no other machines know that, and the root name servers are not going to tell them that you're the authority for the "home" domain unless that top-level domain is officially delegated to you — and that's not likely to happen. The way around this problem is to manually configure your other machines with the address of your test server, X.X.X.X. Any queries it can't answer, it will forward to the original name server, Y.Y.Y.Y, so normal internet access will not be disrupted.
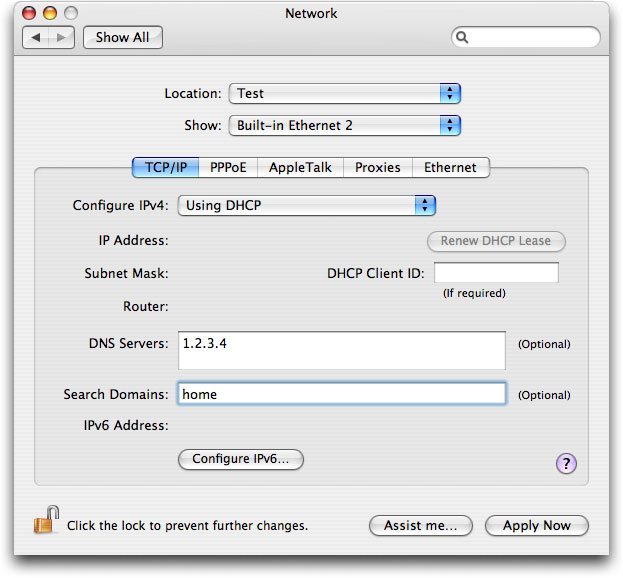
On Mac OS X, or Windows with Bonjour for Windows installed, enter your test server address X.X.X.X as the client's DNS server, and enter "home" as one of your search domains. You can even do this on the same machine that's the server, if you want.

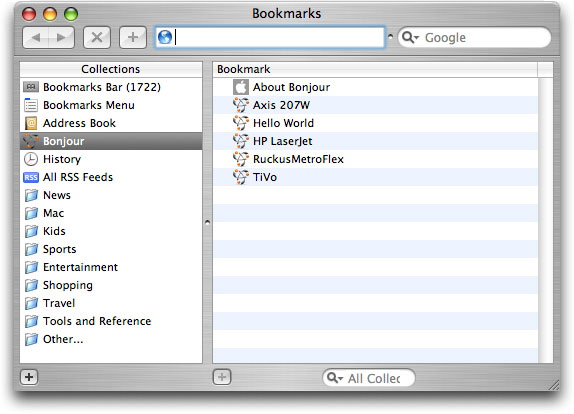
Now run Safari or Internet Explorer, look in the Bonjour bookmarks list, and in addition to the usual locally-discovered web pages, you should see your new "Hello World" entry magically appear:

Now you have a working setup, suitable for experimenting with advertising static services. If you're more comfortable using a graphical user interface instead of editing text files by hand, you can use a GUI tool like DNS Enabler to create the right named configuration file, zone file, Wide-Area DNS-SD records, and then just click the "Start DNS" button to start the name server running.
When you're ready to make the change permanent, you can move the records to your existing DNS server, or if you want to promote your current test machine to a 'real' DNS server, you can get a subdomain officially delegated from your parent domain, to replace its unofficial handling of the pretend "home" domain.
One option, instead of delegating a user-visible subdomain (e.g. "my-subdomain.company.com") to your new server, is just to delegate the "_tcp.company.com" and "_udp.company.com" subdomains to it. This way your server can take over just the service-advertising responsibility from the parent server, but as far as the users are concerned, all the advertied services still appear conceptually in the "company.com" part of the DNS namespace.